| AWicons [Icon Editor] |
 Introduction
 Tutorials
 Icons: general information
| All Products |
 Vista Artistic Icons
| - AWicons 10.0 - | - Copyright © 2000-2008 Lokas Software - |
Step 2: Drawing And Adding Effects To An Icon Using The Built-In ToolsLet's start drawing an icon now, and we'll begin with scratches. In this step we'll draw a standard help icon (a blue filled circle with deep blue stroking and a question mark in the centre). Having drawn an icon, we'll add some effects using built-in tools.It is recommended that you draw, and adjust, your icons with the help of the built-in AWicons tools. Before drawing a circle you must select the color for it and adjust the transparency color to be displayed inside the drawing area. 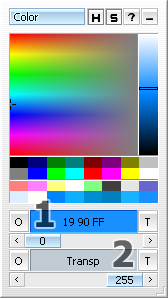
A color may be chosen inside the Color properties window from the color palette, or using color presets. Clicking once on the field (1) opens a window where the primary color may be selected. We have selected 0080CO (light blue) as the main color for the circle. Then, double-clicked on the (2) field, a second brush color has been chosen. To select a transparency color, you must set the transparency level - up to 255 points. We prefer C0C0C0 (light gray) as a transparency color. Tip: you may pick every color from the screen. First, press on the (1) or (2) button (keeping the button pressed), move on to a desired area and then release the button. Having selected the colors, let's begin drawing a circle. Tip: for more accurate drawing you can enable the grid in the editing area. You may select it from the menu View -> Grid in the edit area. Therefore, to allow anti-aliasing and transparency in your icon, press these buttons (2). With the anti-aliasing feature selected, you'll get smooth edges in your icons in 32-bit (Windows XP mode). 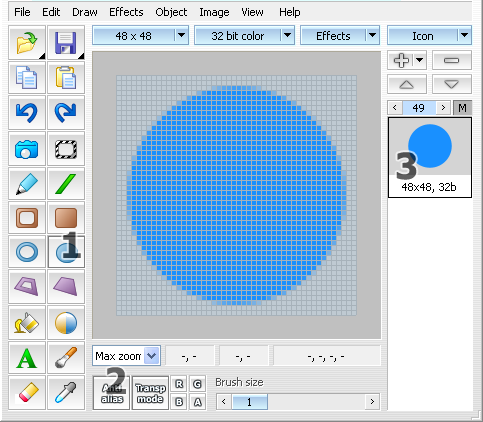
AWicons allows the adding of special, professionally designed effects. It is difficult to add complex gradients and shadows to an icon image for a novice. In this case, it is recommended that you use AWicons built-in professional special effects for this purpose. Adding such effects in AWicons is quite simple too. For example, we'll add water reflections and shadows to our circle. Gradients, reflections and shadows are often used in XP-style icons. To apply these effects to the current picture, you must select "Aqua" from the Effects menu, or choose the same effect using the Effects button. We haven't changed the predefined properties for Aqua effect. As a result, we've got the beautiful, professionally designed sphere. (Shown below) 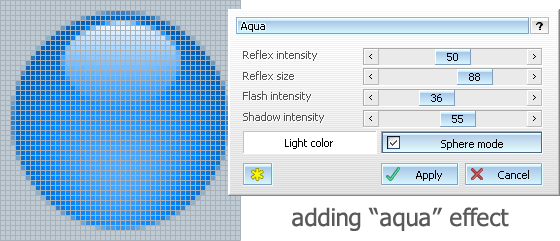
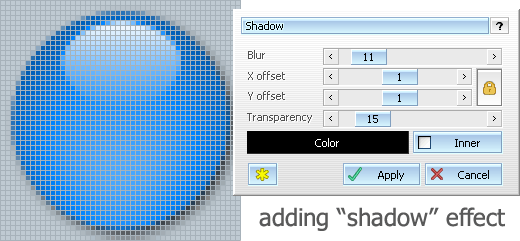
One of the most frequently used effects is a drop shadow. Shadows are standard effects in XP-styled icons. AWicons has a powerful effects engine, and we recommend you to add effects with the help of the built-in tools. So, let's bring some volume into our picture. Adding shadows is simple. To apply this effect to the circle, you need to select "Shadow" from the Effects menu or click on the Effects button and choose "Shadow". Then the Shadow Properties window will appear. You are able to adjust some settings here:
To complete our first icon we need to type in a question mark. AWicons allows adding of text using built-in tools. First, press the "T" or click on the icon (1) in the main toolbar to activate the Text tool. The Text properties window (2) open automatically. Here you may type in the text to be added to the icon and adjust the font settings. Before typing, we have changed the font color to white using Color properties window. Next, change the font settings: select font, font size and weight. Use the "Font..." button inside the Text properties window to access the font settings. We have set Tahoma bold 26px. Having entered the text, press and hold the left mouse button and drag the text where you want it placed. Release the button to complete the text placing. You will not able to move the text after the button has been released. 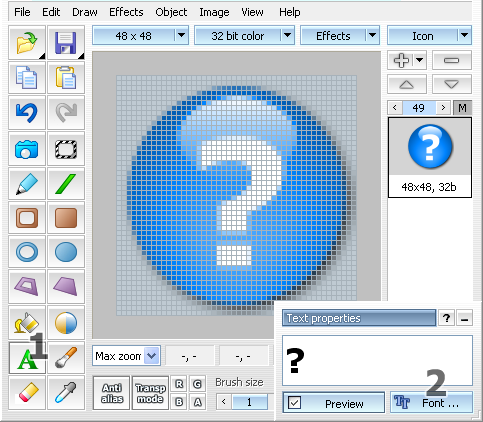
The result is shown below: 
You have created your first icon image! Congratulations! |
| - e-mail: awicons@awicons.com - WWW: www.awicons.com - |